
What's MashingUpdated a day ago
What's Mashing
- First you need to do a mash-in; malt is manually pre-mixed with water and evenly distributed into the mash tun.
- Secondly, you have the mashing phase; water is circulated through the malt bed at specific temperatures for specific durations. This creates a sugary liquid called ''wort''. On average this process takes between 90-120 minutes.
Why Mashing?
- First in the mash-in phase you are wetting the malt and mixing it ensures an even distribution in the mash tun, this is critical for an efficient mashing process.
- Secondly, during the mashing phase; malt contains enzymes that breakdown starch into soluble sugars, these sugars are later on eaten by the yeast to produce alcohol and flavour compounds. The temperature and duration determines the ratio of soluable and unsoluable sugars inside the wort and directly affects the taste of a beer.
- There are 3 steps to setup mashing:
Step 1 - Assembly
Before you start with the mash-in phase, the mash tun needs to be assembled first.
It consists out of a plastic Mash tun, mash tun valve, mash tun tube and cap, mash tun steam seal, filter plates, filling cap, a lid incl. sparge plate and a steam condensor.
For the pre-assembly you need the underlined items. The app will take you through the exact placement.
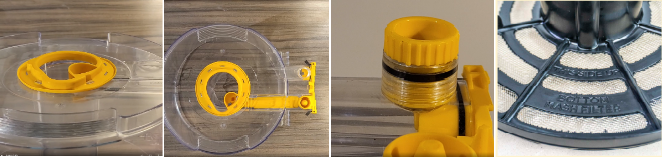 Steam seal Mash tun tube and cap Mash tun valve Bottom filter plate
Step 2 - Pre-mixing the malt
The first step for the mash-in or pre-mixing process is to add the crushed malt into a big bowl. The app will instruct you how much water to mix into the malt because it is dependant on the amount of malt used for the brewing process. Typically it ranges between 0.8-1.4L. Once the malt has been thoroughly mixed and NO more dry areas are present, it is ready for the mash tun. Before adding it into the mash tun, be sure to place the bottom filter and filling cap first.
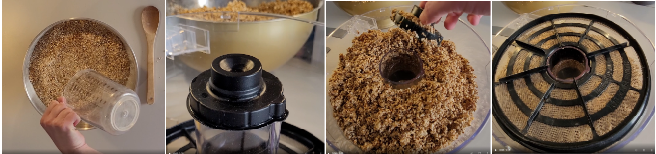 Addition of water Bottom filter and cap Malt distributed into the tun Placement of the top filter
This is the end of the mash-in process and it is time to proceed with the mashing process.
Step 3 - Final assembly
Once the malt has been evenly distributed into the mash tun and the top filter is in place, it is time for the mash tun lid. The mash tun lid contains an extra feature, a yellow place with holes is integrated into the design, this allows for sparging, a method to increase the efficiency of your brewing. You can read more about sparging in the sparging article. Once the lid has been placed it is time to attach the other components
 Placement of the lid Closing the mash tun clips Placing the steam condensor Mounting the mash tun Pressing down firmly
Before the mashing process can be started on the base station, the assembly has to be finished with the addition of the hop carousel.
It is being referred to as the hop carousel, but can also contain other adjuncts like spices and herbs, but primarily hops in pellet form. The 6 hop discs are placed inside the black carousel, the bags are filled with ingredients and handled as instructed by the app. Next the clear cover is added to prevent any foreign materials from getting into the carousel. Finally the top cover is added and the mashing can start.
Happy Brewing!
